Showing posts with label DIY. Show all posts

5.31.2013

Salted Fudge Brownies


This little gem I found on Pinterest is a game changer. Fudge brownie mix + caramel + sea salt = salted fudge brownies. It doesn't get any easier than spreading the batter into a pan (I used Betty Crocker's double fudge brownie mix), drizzling 1/4 cup of  caramel sauce on top of the batter (using a knife to swirl over the surface), and sprinkling sea salt over the caramel.  They are super gooey and moist when they are done and truly the hardest part in this whole process was not shoving each piece in my mouth.  So depending on your level of self restraint, this may only make a half a batch ;)

5.10.2013

Friday Find: DIY


This strawberry angel food dessert is a quick and yummy treat perfect for summer.  It makes enough to be a great addition to a party - or if you are like me, you can just make it for yourself... and maaaaaybe let your boyfriend have a few bites ;)

Ingredients


  • 10 inch angel food cake
  • 1 8 oz package cream cheese
  • 3/4 cup white sugar
  • 1 12 oz container of cool whip, thawed
  • 1 quart fresh strawberries, sliced
  • 1 18 oz jar of strawberry preserves

Directions
Crumble the cake into a 9 x 13 pan.  Next, beat the cream cheese and sugar in a medium bowl until light and fluffy.  Fold in the whipped topping.  Then, mash the cake down with your hands and spread the cream cheese mixture over the cake. Lastly, combine strawberries and glaze in a bowl until the strawberries are evenly coated.  Spread over cream cheese layer... and chill until serving.

4.12.2013

Friday Find: DIY


If I feature any type of recipe, I promise it will be stupid easy...  Many of you asked about the butterscotch sticky buns I made on Easter, so here's the recipe!  And the best part is that all the hard work is done the night before.  I highly suggest giving it a try this weekend :)

Ingredients
  • Rhodes frozen dinner rolls (16 - 18)
  • 1 package of cook and serve butterscotch pudding
  • 1/2 cup of brown sugar
  • 1/2 cup chopped pecans
  • 1 stick of unsalted butter

Directions (prepare the night before)
After greasing the bottom of a bundt pan, put the frozen rolls at the bottom.  Sprinkle the dry pudding mix over the rolls, following by the brown sugar and then the pecans.  Next, melt the butter and pour over the rolls/pudding/sugar/pecans.  Then cover the bundt pan with a damp cloth (I add an "abracadabra" but that part is optional).  In the morning your rolls will have doubled in size - and all you have to do is remove the damp cloth and bake in the oven for 30 minutes at 350 degrees.  Pour out the gooey goodness on a plate and enjoy!

3.29.2013

Friday Find: DIY


Hangers & Shower Curtain Rings (Target)

After about a year and a half together, Tom is moving in with me... Which is awesome!  I can't wait to see him every day, and Rex is in desperate need of a stable father figure ;)  This means I need to clear out my spare bedroom closet for his stuff, and use my current closet space as efficiently as possible. My scarves were taking up entirely too much space, and I needed better system. Turns out I own 31 scarves (a fact I was unaware of until last week)... which  unofficially makes me the the Baskin Robbins of scarves.   After googling "scarf organization", I bought wooden hangers and plastic shower curtain rings (under $8 total) and was able to hang 10-12 scarves per hanger... and suddenly my closet got a lot bigger.  And, if anyone needs to borrow a scarf, just let me know - I've got 31 flavors! ;)

3.15.2013

Friday Find: DIY


I mentioned earlier this week that last weekend was my Mom's birthday - and it was a big one :)  She didn't want a party-  just a quiet celebration with immediate family.  So my brother flew in from Atlanta and I drove over from Minnesota (destination = Pewaukee, Wisconsin).  And even through she didn't want a fuss, I still wanted to do something special.  After looking for inspiration on Pinterest, I found the perfect way to celebrate her big day...  I contacted friends and family and had them send me a favorite memory of my Mom - and I put together 60 memories to represent her 60 years.  It was a great way of bringing loved ones to her... and we all had fun reminiscing on memories that made her shake her head,  laugh, and cry.  Personally I think the memory from Rex was her favorite :)


12.21.2012

Friday Find: DIY


This year the gifts that I struggled the most for were the Grandmas... there is not a lot they need or want. So I picked up these pretty ornate frames from Marshalls and printed out a fun quote about "Grandma's House".  It's a cute way to gift and personalize a picture frame, and can be used for anyone loved one. Not to mention these quotes speak the truth :)  

Oh and do yourself a favor and pick up Taylor Swift's Red.  I've been listening to it on repeat for 2 days straight.  It's all things fun and girly - and makes you feel like a teen...it's fabulous.


12.07.2012

Friday Find: DIY


Frame, ornaments and ribbon (Dollar Tree)

Is everyone aware of how fabulous the Dollar Store is?  For under $5 total, I bought a 8.5 x 11 picture frame, ribbon, and various ornaments.  After removing the frame's glass and back, and spray painting it silver - I had the perfect window frame to feature my mini ornaments.  It's a easy and simple decoration that you can change up for any season or holiday. I hung this up in my kitchen, and have to admit that I'm quite proud of my dollar store special :)  

11.16.2012

Friday Find: DIY


Breaking Dawn book to show scale (which I'm seeing tonight, yay!)

Canvas/Acrylic Paint/Letter Stencils (Michaels)

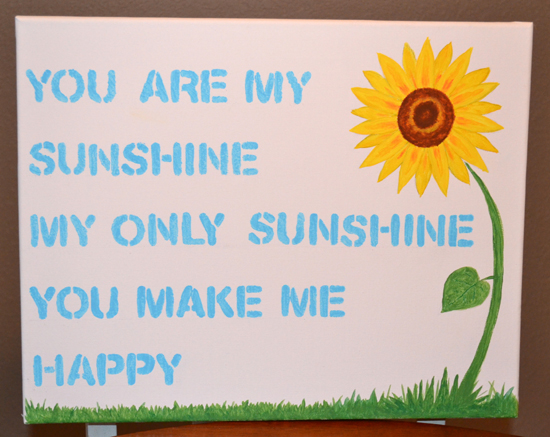
When I was a little girl, I would climb onto my Aunt Janie's lap and she'd sing "You Are My Sunshine".  And when it got to the part "you make me happy, when skies are..."  - she would let me pick the color of the sky.  And let me tell you, for a five year old girl this was the coolest thing ever - Aunt Janie had some major connections to be able to just change the song like that! And nothing made me feel more special than being able to pick crazy colors like a pink or purple sky.  So I painted this and am giving it to my favorite aunt as a "thank you" for making me feel so special and important - I'll never forget those moments  :)  

11.02.2012

Friday Find: DIY


Cookie Sticks & Paper Cutter Stamp (Michael's)

For my boyfriend's birthday I wanted to do something special for his "birthday cake". I didn't want to risk putting my adequate at best baking skills to the test, so I decided to buy cupcakes and make cupcake toppers.  Luckily his mom was my willing accomplice in gathering cute/funny/embarrassing childhood pictures :) After a few trips to Walgreens' photo department to perfect the size, I used a 3 inch paper cutter stamp on colored construction paper, glued on the pictures, and then taped that to a cookie stick.  It's a fun way to add a personal touch - even if you can't bake a cake ;)

10.19.2012

Friday Find: DIY


For my boyfriend's birthday, one of the gifts I gave him was personalized map coasters.  I ordered highway maps (free) from the states we've been to together... and then cut out the cities that were special to us (first date, trips together, hometowns, etc) and glued them to coasters I bought at the dollar store. It's an great DIY gift that is thoughtful, useful, and unique.  I also made the card... just grab a candle and use that as the "i" in "wish" - so easy!

10.05.2012

Friday Find: DIY


One of my best friend's got married last weekend, and I wanted to include some personalized presents with their wedding gift.  These are small and easy ways to add a personal touch - of course Pinterest was to thank for most of these ideas!

  • Wedding Invite Ornament:  I cut up their wedding invite into strips, added some glittery leaves and a heart charm, and then tied it up with the ribbon from the the invite.
  • Lucky Penny Key Chains:  I found pennies in the year the couple met and the year they got married, and put each on a key chain (had the the boy drill holes in the pennies).
  • Date Jar:  I wrote different date ideas on scrapbooking paper for when the old married couple runs out of things to do ;)
  • Mrs & Mrs Mugs: All you need is mugs, Sharpie markers, and an oven to bake them at 350 degrees for 30 minutes to hold the design/writing.

9.28.2012

Friday Find: DIY


Why I've not been using food to hold food until now is beyond me...  Life should really be divided into pre-Pinterest and post-Pinterest (and pre-Pinterest just doesn't count).  The next time you have to whip up some munchies just get a bunch of veggies, and then hollow out a couple of peppers to hold the dip.   It's an easy and quick appetizer - and guaranteed to earn you points for creativity :)

9.21.2012

Friday Find: DIY

Pumpkins (Dollar Store); Leaves & Spray paint (Michaels);

Pumpkins (Target); 


Since I'm in the midst of transitioning my wardrobe to fall fashion, I thought it was time to do the same for my home.  I wanted to updated my mantel to reflect the fall season and through a trip to Michael's, the Dollar Store, some spray paint, and repurposing some vases I already owned, I managed to create an autumn display that makes me happy :)  

9.07.2012

Friday Find: DIY


If you follow me on Pinterest, you may have already seen this. But after trying it for myself I can tell you with certainty it's as delicious as it looks.  Baileys Irish Cream with coffee ice cubes = genius!  I've always used my melting ice as a sign I needed to drink faster... but no more!  Just freeze any coffee in an ice cube tray (evidenced by the pic above I recommend having a dedicated coffee ice cube tray).  Next, throw a few coffee cubes in a glass of Baileys (imitation Baileys will not do).  And the last and most important step is enjoying as each sip gets better and better...

And yes I'm counting it as a DIY since I made the coffee :)

8.10.2012

Friday Find: DIY

Bride to be glasses (backside view)

"BRIDE" margarita glass

Champagne Glass 

"ASHLI" wine glass

Two weeks in a row of DIY.... I know, who do I think I am?  This project is for the same bachelorette weekend as last week's tissue paper flower bouquets.  I wanted the bride (Ashli)  to have special glasses to drink out of during her weekend. And let me warn you... DIY's are a slippery slope. Once you conquer one, you think you are Martha Stewart. And now I have a "DIY" board on Pinterest filled with glass jar lights and picture frame projects (odds are I'll end up settling for a wine cork board, and then only collect the corks). Okay, back to the glasses!  PS, the term "blingy" below is the official term for the shiny diamond looking buttons you can buy at the craft store :)
_________________________________________

Step 1: Choose your glasses (I got all three from Home Goods).
Step 2: Create veil:  Cut a 6 inch piece of tulle (Michaels), gather one side to look like a veil and staple at the gathering. Next, super glue a blingy (Michaels) to hide the staple.
Step 3: Attach veil: Super glue a smaller blingy to the glass where you want to attach the veil, and then super glue your veil to the smaller blingy.
Step 4: For the "BRIDE" and "ASHLI" letters I used sparkly alphabet letters (Michaels).

8.03.2012

Friday Find: DIY

Tissue Paper & Mason Jar/Vase (Michaels);
Kabob Skewers (any Grocery Store)

Let me preface this post by saying I am not a DIY'er... I can barely make my own dinner.  So if I've found a DIY I can master - then literally anyone can do it.  This weekend I'm celebrating the upcoming wedding of one of my best friend's at her cabin up north, and on Saturday we are doing a Mexican Fiesta dinner. I wanted to bring some decor that was bright, fun, and personal - and through the power of Pinterest I came across tissue paper flowers.  After giving myself the "you can do it" pep talk... I started churning out flowers.  Then I found a bunch of jars and vases around my place, and used kabob skewers for the stems. It's not quite a meal, but I managed to create something from scratch! There really is a first time for everything :)

Click here for an easy tutorial on making tissue paper flowers.
BLOG DESIGN BY DESIGNER BLOGS